
Similar to Zomeworks.
Last modified on 20010302
Bigdog wrote this.
If anyone knows how to get in touch with him please let me know.
This text was dredged up by:
Scott Whitney
<DED_SAW@hal.lamar.edu>
Thanks for the good work Scott!
I know there are several more images that were on Bigdog's web site when it was up.
I (Bigdog) set out to design and construct a passive solar tracker.
I wanted it to be a shade tree operation with backwoods
engineering. There were three parameters:
1. Cheap. If it didn't work, I wasn't out a whole lot.
2. Constructed with tools I had,
    - 3/8" hand drill 'n' bits
    - tap
    - hacksaw
    - hammer
    - welder
    - flaring bar
    - CNC turret lathe, I wish
3. Cheap, locally available materials. I didn't want to special order anything.
Finding a working fluid was the hardest part. I wanted something that was cheap, non flammable, and wouldn't kill me if I got a whiff. The compromise was propane, which is a little flammable, but has similar vapor pressures as freon. However, density, and latent heat of vaporization are different, but it was so cheap.
I opted for stouter material because the idea of tubing rupturing some hot July afternoon was not appealing. If I recall, the static pressure is around 200psi@100oF.
Remember, this is backwoods engineering.
I went to town and got...
The materials:
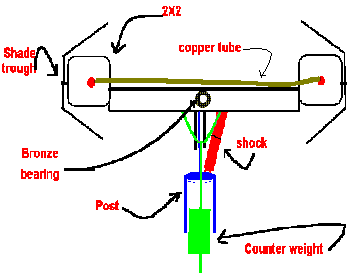
    - 6 feet of 2x2 square tubing.
    - 4 end plates of 3/8" steel to fit inside the 2X2
    - 8 feet of 1 1/4" angle iron
    - 2 brass el's NPT to flare with nuts
    - 1 - small roll of 3/8 " OD copper tubing
    - 4 - stubby little bolts with nuts and fender washers
    - 1 - cheap shock absorber
    - 2 - bushing to fit in the ends of the shock
    - 2 bolts, washers, and nuts to fit the bushings that fit the shock,
that Jack built....
    - 3 feet 3/8" rod
    - 2 - bronze flange bearings to fit the rod
    - 3 feet 3/4" black pipe
    - 2 - gas cocks with NPT fittings and caps
    - 1 - U-bolt with nuts
    - 2 feet of threaded rod
    - 6 - cans of beer
    - misc. plate steel to fashion a mount and a couple of bolts
    - 20# tank of propane
    - 4 - 6 feet of high pressure hose
    - fittings to go from tank to gas cock
    - jug of anti freeze
    - 2 - 3 foot lengths of 26 ga galvanized approx 8 1/2" wide
    - 1 can flat black paint
I cut the 2x2 in half. The end plates seemed to be overkill, but I rationalized the fitting that were to be screwed in might just need the depth. I drilled a hole through each in the center, and welded the into the ends of the 2x2.
I cut the angel iron in half and welded them to the 2x2's. The flat about 11/4" below flush, and 4" in from the ends. This forms a nice sturdy, square frame.
I cut the 3/4" pipe about 1/2" less than the width between the angles. A few holes were drilled in the length of the pipe and 3/8" rod was run inside and spot welded through the holes. This forms the pivoting axis and support for the whole gizmo.
Now I realized I had made a mistake and had to cut one of angles from my nice sturdy square frame to get the support rod through the bronze bearing, which I had also forgotten to place in the center of the angles. You can save a lot of time if you don't make this mistake.
I took three pieces of plate steel. Welded two of them to the pivoting support, with the third piece in between, bored a hole and ran a bolt to allow for seasonal adjustments. On the next one I would place a little below the equidistant point to achieve better weight distribution, because now I remember counterweights.
The U-bolt got welded to the thread rod, like a two tooth pitch fork. This was mounted on the lower angle iron, straddling the pivot bearing. It looks like an add-on 'cause it is. I needed a way to hang movable counter weights. This was the cheapest way I could think of.
Four stubby bolts were welded on the outside of the 2x2's roughly a foot or so from the end and along the centerline. The four holes were tapped in the end plates.
Next, I mounted this monster on a pedestal.
I figured the length of the shock, extended and compressed, welded the bolt to the upper angle iron at a position where the swing arc utilizes the length without jamming the shock into the pivot support. I welded another angle from the pivot support to the bottom of the shock.
The fittings were doped and threaded, gas cocks on top and el's on bottom. The copper tubing was cut and flared to fit. I found a little bow is better than no bow.
I took a two liter bottle, mixed a 50/50 solution of antifreeze, and poured most of it into the 2x2's.
I connected the hose to one of the gas valves on the gizmo and to the 20# tank of propane. With the gas cocks closed, I inverted the tank and opened the valve. I opened the "far" gas cock all the way, and cracked the "hose connected" one. The antifreeze mixture was siphoned into the "far" 2x2. When it had started to gurgle, I opened the "hose" gas cock all the way. After the initial flash gas and air were vented, (I mean, it spewes.) I closed the "far" gas cock. The object being to get some liquid propane into the 2x2's.
I was a little worried about this whole propane thingy, but it wasn't nerve racking enough to light up a cigarette to calm down. I soaped all the welds and fittings to check for gas leaks. I did find one on the end of one 2x2, but a little peening with a hammer cured that.
The sheet metal is broken to 45 degrees about 3 1/8" in from both sides. This shade trough is then placed up to the 2x2's and tapped on the bolts. While drilling the marked holes, I let the paint dry.
I affixed the shade troughs under the shade tree and allowed the temperature to equalize. This is what the beer is for. By guess and by golly, I tilted the bottom up and down, left and right to equally distribute the antifreeze mix and adjusted the counter weight (initially a coffee can filled with sand).
After I got the gizmo to balance, I attached the shock and placed the whole thing in the sun for a few weeks to tweak it. I confess I had to a pressure pop off valve and gauges on the gizmo during this time. They were removed when I put 3 PV panels on it.
What I would do differently ... maybe.
I would re-position the 2x2's on the angle irons so it would be less top heavy.
... try brazing or silver soldering he copper tubing into the 2x2's
... use sealed ball bearings rather than bronze bearings, and increase the bearing surface
... eliminate one gas cock and just blow-by a cap on the fitting
... make the shade troughs slightly longer
... buy more beer