http://www.redrok.com/images/ledshex3.jpg

LED3
6. Apply 12 volts to the circuit through the connector.
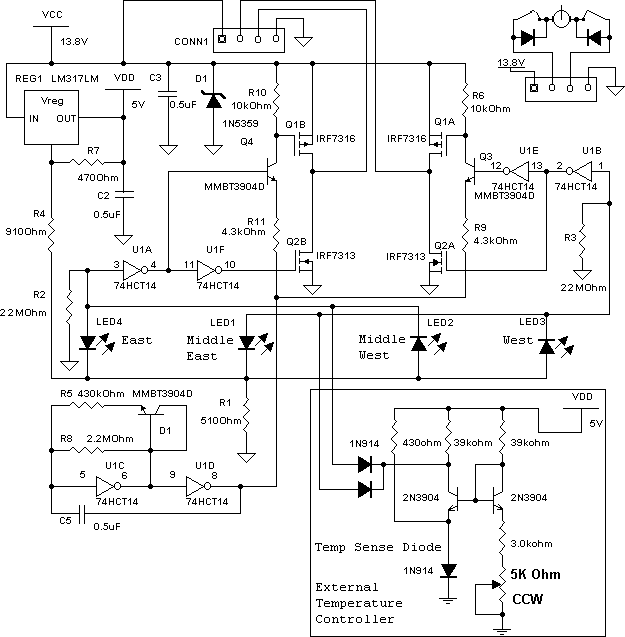
7. Observe that the LM317LM is regulating to about 5 volts. And that there is about 1.4 volts on the four outer LED pad.
8. Add the 74HCT14.
9. Observe 5 volts on pin 14 and 0 volts on pin 7.
10.Observe pin 8 to see the oscillator output. This is mostly at 5 volts with short drops to 0 volts.
11. Add the 4 LEDs to the board. Leave the LEDs in the fanned out position as indicated by the position of the mounting pads. This gives the outer LEDs an additional 15 degrees angle.
12. Observe that the voltage on the input to pins 1 and 3 change voltage to between about 0 volts and 3volts when the LEDs are illuminated with a strong light source. Move the tracker about to see these voltages are changing.
13. Observe the voltage on the IRF7313 pads 1 and 3. These should be either 0 volts or 5 volts depending on orientation of the light source. There should never be 5 volts on the pins at the same time. (After final adjustment of the LED position its possible for them both to have 5 volts but not for now.)
14. Observe the voltage on the IRF7316 pads 1 and 3. These should be mostly at 12 volts with intermittent drops to about 4 volts depending on the orientation of the light source. For any orientation only on of the pins will be dropping to the lower voltage.
15. Add the IRF7313 and IRF7316 MOSFETs and solder the center two pins of the connector.
16. Make sure there are no shorts to ground or between the center connector pins.
17. Apply power and observe that the voltages on the center pins of the connector are pulsing dependent on the orientation of the light source. A test circuit with a pair of small red and green LEDs connected back to back and in series with a 470 ohm resistor on the center pins of the connector will indicate which way the bridge is driving. The color indicates east or west movement dependent on the orientation of the light source.
18. Add the 1N5359 24 volt 5 watt zener diode between the positive terminal of the connector and the ground foil. The banded end is connected to the positive terminal.
19. Connect to a linear actuator and observe the operation of the actuator. The linear actuator must have limit switches, properly adjusted, with internal reversing diodes across the switches. This protects the driver from excessive current should the actuator run into the end of travel and stalls.
20. To temporarily disable the oscillator one can ground the foil on the backside of the board near the logo using your finger. This will activate the H-bridge continuously for testing.